Yay Friday: Edible finger paint

2013-10-24 11.56.47

Welcome to the second installment of Yay Friday: Edible finger paints. I’m pulling from the archives because we’ve all had colds and winter bugs around here and haven’t been feeling as playful. But the spring is back in our step now, and I hope to get back on track here.

Edible finger paints are great fun for little artists old enough to sit up. We used our high chair to contain the mess a little. There’s plenty of recipes online for edible finger paint, but we went with a simple one in which we already had the supplies on hand.

What you need:

  • Cool Whip (or generic brand dessert topping)
  • Food coloring
  • Paper

Gel food coloring seemed to blend easy and work well. Make sure you dress your little one in play clothes as food coloring can stain clothes. I had some heavy card stock paper which easier for me to hold still and seemed to hold up well against uncoordinated little fingers.

At the time, I was a little apprehensive about whether I should let me 6-month-old taste Cool Whip when we were just introducing foods, but he was so enamored with the texture and colors that he didn’t even try tasting it once. Plus I made it in such small quantities, that he would hardly be able to ingest more than a tiny taste. However, I did have to hold the paper to the high chair tray (another option would be to tape it down), because my little teether DID want to nibble on the corner of THAT.

This activity was a blast, inexpensive and I’m excited to try it again now that he’s a little bigger and his motor skills are growing by leaps and bounds.

Make a masterpiece!


2013-10-24 11.59.28

How to make a Barbie dreamhouse

Countdown the Christmas:

A series of DIY projects
and holiday inspirations.

DSC_0057

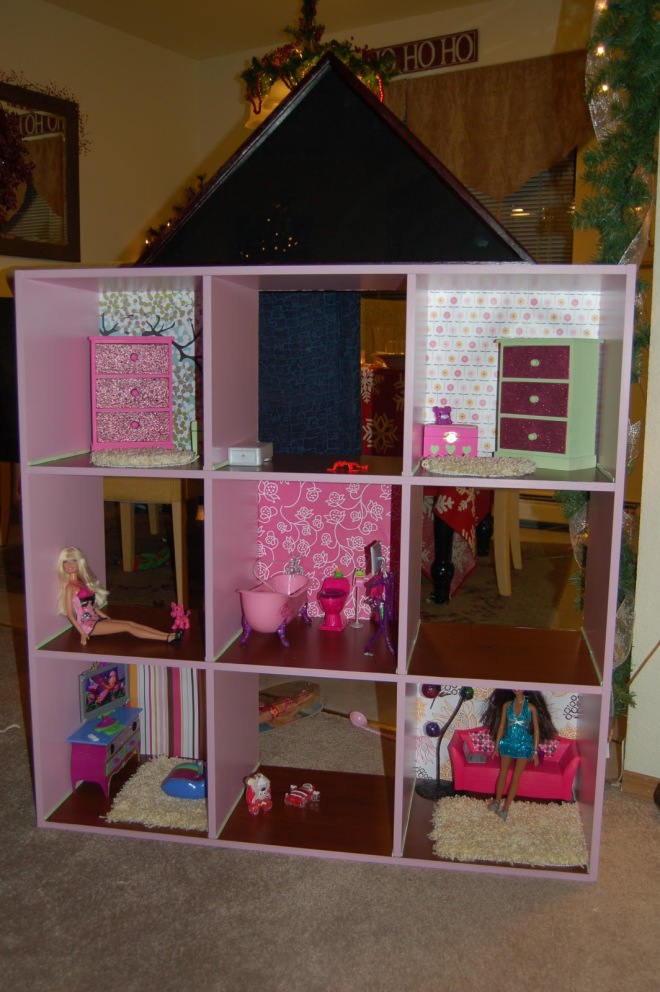
With Christmas around the corner, I want to share the Barbie Dreamhouse my friend Kim and I collaborated on a couple Christmases ago. I’ve blogged about it elsewhere previously, but I’m so in love with the finished results of this project I had to show it off here. I have boys, so there probably won’t be any DIY Barbie Dreamhouses in my near future.
Kim wanted to give her then 5-year-old twins a Barbie dream-house for Christmas, but didn’t want to break the bank on something that might break easily. With four kids, she knows delicate a plastic dollhouse with lots of little parts and pieces wouldn’t last long. So we embarked on a shopping adventure to find the right tools to build our own, sturdier version.

DSC04722

Originally, we were thinking we would make over a bookshelf, but then we found this storage cube shelf and it was already pink! Normally, $50-$60 for one of these bad boys, we walked on a $20 sale at Fred Meyer. Plus we had an extra 15 percent off coupon for housewares. The shelf is perfect because it already has build-in room dividers. It’s simple with lots of room for young imaginations.

The whole thing was pink, so we lined the shelves with wood-grain contact paper to give the house wood floors before assembling the shelf per the package instructions.

DSC04724

We bought a variety pack of scrapbook paper at the craft store and covered the back panels with the “wall paper” using clear contact paper to adhere it and give them a protective coating.

DSC_0044

I found a few unfinished wood jewelry/notions boxes at JoAnn’s fabrics that made excellent furniture with a little acrylic paint.

For area rugs we cut circles and rectangles out of a bathroom rug from the Fred Meyer home section (also purchased with aforementioned coupon).

DSC_0045

We painted balsa wood strips mint green and glued them to the corners to create molding to give the rooms a finished look.

DSC_0046

Santa somehow knew the girls were getting a Barbie dream house and brought the girls furniture sets like this bathroom set complete with a flat-screen TV mounted to the towel rack. Barbie is apparently one classy gal.

DSC_0047

DSC_0052

DSC_0020toned

For a roof, we used a flag case from Michael’s craft store.

They seemed to like it.